Dialup system watch
When working from home, my Linux server, which acts as a file server and router for the rest of the house, is connected to the Internet for pretty much most of the time. To my wife, I can justify the pay-per-minute dialup expense with work-related reasons. But when I'm away, those reasons aren't relevant. So for most of the time, the connection is down. Now and again though, I do need access to things on the server at home. After my wife grew tired of answering the phone and have me talk her through going downstairs into the cellar, getting the server to dial up, and finding out the IP address, I decided there was a better way. I could take one step in the right direction by getting the server to dial up at specified intervals and I would hop on at the pre-ordained times if I needed to. But there was a problem with this, which I'll describe in a second.
Most of the time at customer sites, I'm running a Jabber client of some sort. Whether it's WinJab on Windows, or Jarl in cli (command line) mode on a remote server over an ssh connection, I can get my fix. This platform—my Jabber client—turns out to be an ideal ready-made component for my solution.
Here's how it would work:
Get the server to dial up and connect to the Internet regularly
On connection, start a script that sends Jabber presence to me
On disconnection, get the script to end
While the Jabber client sits on my desktop screen, I am aware of things going on in the Jabber-based conversation world; people would send me messages, my email alert mechanism would punt the subject line of important incoming mails to me, and I could see who (and what) was coming and going in my roster—the collection of people and services I have in my contact list. If I could somehow add to my roster a JID that represented my server at home, I could subscribe to the server's presence and know when it was available—connected to the Internet—and when it wasn't.
This would solve the problem I'd previously had with the timing of the automated dialup: I'd set the server to dial up every hour, or every two hours, and to stay online for ten minutes or so each time, but invariably due to timekeeping discrepancies, eddies in the space-time continuum, and the fact that I don't wear a watch, the poor timing between me and the server meant that I often missed the online window.
The preparation
Before diving into the script, it's necessary to do a bit of preparation. We're going to be using the presence subscription concept, which is is described in Chapter 5, and covered in more detail in the next section in this chapter. We're also going to have to get the script to run, and stay running, when the dialup connection is made, and have it stop when the dialup connection is ended.
Presence
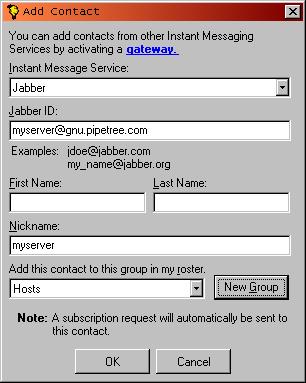
Rather than get involved in the nitty gritty of presence subcriptions right now, let's use the tools that are around us to get things set up. In order for this to work, we need to be subscribed to the presence of the script that will be invoked when the server dials up and connects to the Internet. The script will connect to the Jabber server using a JID with a username that represents the Linux server: myserver@gnu.pipetree.com. My JID in this case is dj@gnu.pipetree.com, so we just use whatever Jabber client happens to be at hand, say Jabber Instant Messenger (JIM), to effect both sides of the subscription.
- Step 1: Create JID myserver@gnu.pipetree.com
We need to create the script's JID if it doesn't already exist. We can use the reguser script we wrote in the section called User Registration Script in Chapter 6 to do this:
[dj@yak dj]$ ./reguser gnu.pipetree.com username=myserver password=secret
[Attempt] (myserver) Successful registration
[dj@yak dj]$
- Step 2: Subscribe to myserver's presence
We start JIM with the JID dj@gnu.pipetree.com, and add myserver@gnu.pipetree.com to the roster. This should automatically send a presence subscription request to the JID. Adding the JID to the roster using JIM is shown in Figure 7-2.
- Step 3: Accept presence subscription as myserver
Now connecting with the myserver JID, again, using the JIM client, we accept the presence subscription request from Step 2, so that dj@gnu.pipetree.com will automatically receive myserver@gnu.pipetree.com's availability information. Whether or not myserver subscribes to dj's presence is irrelevant in this case, as the script itself is not interested in the availability of anyone at all.
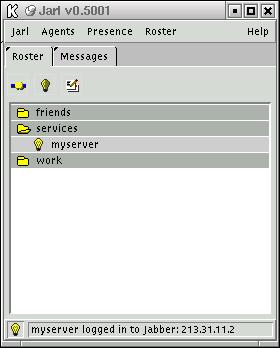
At this stage, the entry in dj@gnu.pipetree.com's roster that represents the Linux server will indicate whether the script run at dialup time is active or not. If we continue to use the JIM client, we will see that this is shown by a yellow bulb, or no icon at all, respectively.
Starting and stopping the script
The dialup connection is set up using the Point to Point Protocol daemon pppd. This uses a program such as chat to talk to the modem and get it to dial the ISP. The pppd mechanism affords us an idea way to start and stop a script on the respective connection and disconnection of the line. When the connection has been made, the script /etc/ppp/ip-up is invoked and passed a number of connection-related parameters. Similarly /etc/ppp/ip-down is invoked when the connection is closed.
Some implementations of pppd also offer /etc/ppp/ip-up.local and /etc/ppp/ip-down.local which should be used in place of the ip-up and ip-down scripts if they exist.
So what we want to do is start our script with ip-up[.local] and stop it with ip-down[.local]. What these starter and stopper scripts might look like are shown in Example 7-3 and Example 7-4. They are simply shell scripts that share the process id (PID) of the Jabber script via a temporary file. The starter starts the Jabber script and writes the PID of that script to a file. The stopper kills the script using the PID.
Example 7-3. An ip-up starter script
#!/bin/sh

# Change to working directory
cd /jabber/java/

# Call the Jabber script and put to background
/usr/java/jdk1.3.1/bin/java -classpath jabberbeans.jar:. HostAlive $5 &

# Write the running script's PID
echo $! > /tmp/HostAlive.pid
Example 7-4. An ip-down stopper script
#!/bin/sh

# Simply kill the process using the
# JID written by the starter script
/bin/kill `cat /tmp/HostAlive.pid`

# Remove the PID file
/bin/rm /tmp/HostAlive.pid
Example 7-3 shows that we're passing through one of the parameters that pppd gives to the ip-up script: the remote IP address—that by which the server is known during its temporary connection to the Internet—in the $5 variable. [1] This IP address can be passed along as part of the availability information in the <presence/> element, so that the recipient (dj) can see what IP address has been assigned to the server.
The Jabber script
As you might have guessed from looking at Example 7-3, we're going to write this script in Java. We'll use the Jabberbeans library; see the section called The Software in Chapter 1 for details of where to get this library and what the requirements are.
Let's start by importing the libraries (the classes) we would like to use:
import org.jabber.jabberbeans.*;
import org.jabber.jabberbeans.Extension.*;
import java.net.InetAddress;
The Jabberbeans Jabber library is highly modular and designed so we can pick only the features that we need; in this case, however, we're just going to import the whole set of classes within the org.jabber.jabberbeans and org.jabber.jabberbeans.Extension packages, for simplicity.
We're also going to be manipulating the Jabber server's hostname, so we pull in the InetAddress class for convenience.
The script must connect to the Jabber server on gnu.pipetree.com as the myserver user. We define some constants for this:
public class HostAlive
{
  public static final String SERVER   = "gnu.pipetree.com";
  public static final String USER     = "myserver";
  public static final String PASSWORD = "secret";
  public static final String RESOURCE = "alive";
In the same way as our Python-based CVS notification script earlier in this chapter, we also start off by building a connection to the Jabber server. As before, it's a two-stage process. The first stage is to create the connection object:
  public static void main(String argv[])
  {

    ConnectionBean cb=new ConnectionBean();
A ConnectionBean object represents the connection between your script and the Jabber server. All XML fragments;—Jabber elements—pass through this object.
Then it's time to attempt the socket connection and the exchange of XML stream headers:
    InetAddress addr;

    try
    {
      cb.connect(addr=InetAddress.getByName(SERVER));
    }
    catch (java.net.UnknownHostException e)
    {
      //from getByName()
      System.out.println("Cannot resolve " + SERVER + ":" + e.toString());
      return;
    }
    catch (java.io.IOException e)
    {
      //from connect()
       System.out.println("Cannot connect to " + SERVER);
       return;
    }
We create an Internet address object in addr from the hostname assigned to the SERVER constant. As the creation of the addr instance may throw an exception (unknown host), we combine the instantiation with the connection() call on our ConnectionBean object which may also throw an exception of its own—if there is a problem connecting.
At this stage, we're connected and have successfully exchanged the XML stream headers with the Jabber server. So now we must authenticate:
    InfoQueryBuilder iqb=new InfoQueryBuilder();
    InfoQuery iq;
    IQAuthBuilder iqAuthb=new IQAuthBuilder();

    iqb.setType("set");


    iqAuthb.setUsername(USER);
    iqAuthb.setPassword(PASSWORD);
    iqAuthb.setResource(RESOURCE);

    try
    {
      iqb.addExtension(iqAuthb.build());
    }
    catch (InstantiationException e)
    {
      //building failed ?
      System.out.println("Fatal Error on Auth object build:");
      System.out.println(e.toString());
      System.exit(0);
    }


    try
    {
      //build the full InfoQuery packet
      iq=(InfoQuery)iqb.build();
    }
    catch (InstantiationException e)
    {
      //building failed ?
      System.out.println("Fatal Error on IQ object build:");
      System.out.println(e.toString());
      return;
    }

    cb.send(iq);
Yes, that's an awful lot. Let's take it piece by piece.
Figure 7-3 shows how the objects in this section of code interrelate and represent various parts of what we're trying to do—which is to construct an authorization element. This takes the form of an IQ-set containing a <query/> tag qualified by the jabber:iq:auth namespace like this: [2]
<iq type='set'>
  <query xmlns='jabber:iq:auth'>
    <username>myserver</username>
    <password>secret</password>
    <resource>alive</resource>
  </query>
</iq>
Constructing Jabber elements with Jabberbeans uses so-called builders that allow individual element components to be created separately and then fused together into a final structure. In our code, we use two builders: an InfoQueryBuilder to construct the <iq/> envelope and an IQAuthBuilder to construct the <query/> content.
Taking the code step-by-step, we create or declare each of the three things iqb, iq, and iqAuthb in Figure 7-3:
    InfoQueryBuilder iqb=new InfoQueryBuilder();
    InfoQuery iq;
    IQAuthBuilder iqAuthb=new IQAuthBuilder();
Figure 7-3. Creating the authorization packet
 +--+
 |iq|--------+
 +--+        |
             |
             v

           [4]
        +- build()
 +---+  |
 |iqb|--+- [3b] addExtension() -----------+
 +---+  |                                 |
   |    +- [1] setType() ------+          |
   |                           |          |                                +-------+
   |              +------------v----------|-------------+ +-- represents --|iqAuthb|
   +- represents -> <iq type='set'>       v             | |                +-------+
                  |    +--------------------------------:-v-+                    |
                  |    | <query xmlns='jabber:iq:auth'> :   |     [2]            |
                  |    |   <username>myserver</username>: <------ setUsername() -+
                  |    |   <password>secret</password>  : <------ setPassword() -+
                  |    |   <resource>alive</resource>   : <------ setResource() -+
                  |    | </query>                       :   |                    |
                  |    +--------------------------------:---            build() -+
                  | </iq>                               |               [3a]
                  +-------------------------------------+
There are numbered steps in Figure 7-3; these follow what happens in the rest of the authentication preparation:
- Step [1] Set the type attribute of the IQ
We call the setType() method on our iqb object that represents our outer IQ envelope to set the value of the type attribute:
iqb.setType("set");- Step [2] Set the values for the parts of the authorization section of the element
Having constructed our iqAuthb object, which represents the <query/> portion of our element, we fill the values with these calls:
iqAuthb.setUsername(USER); iqAuthb.setPassword(PASSWORD); iqAuthb.setResource(RESOURCE);- Step [3] Crystallize iqAuthb and add it to the IQ object
Once the values inside the authorization <query/> tag are set, we can call the build() method on the object representing that tag (iqAuthb) to generate an extension object—to crystallize the tag— that can then be attached as an extension to the iqb object using the addExtension() method:
try { iqb.addExtension(iqAuthb.build()); } ...- Step [4] Crystallize iqb and assign it to the iq object
In the same way that we crystallized the authorization <query/> tag, we can crystallize the whole element and assign it to iq:
    try
    {
      //build the full InfoQuery packet
      iq=(InfoQuery)iqb.build();
    }
    ...
Once we've constructed our authorization element, now held as the iq object, we can send it down the stream to the Jabber server with the send() method of the ConnectionBean object cb:
cb.send(iq);
Finally, once we've authenticated, we can construct our presence packet and send it. [3] This is achieved using the same technique as before. We construct a new object to represent the presence packet denoting general availability—<presence/>:
PresenceBuilder pb=new PresenceBuilder();
In this case, there are no namespace-qualified extensions to add to our <presence/> element, but we do want to add the IP address that was passed into the script and available in argv[0]. We can use the setStatus() method on our presence object to set the optional <status/> to contain that IP address:
pb.setStatus(argv[0]);
After this, we can go ahead and crystallize the element, which will look like this:
<presence>
  <status>123.45.67.89</status>
</presence>
After the crystallization with the build() call, we send it down the stream in the same way that as the authorization <iq/> element:
    try
    {
      cb.send(pb.build());
    }
    catch (InstantiationException e)
    {
      System.out.println("Fatal Error on Presence object build:");
      System.out.println(e.toString());
      return;
    }
As for each of the build() calls, we must trap a possible exception that build() throws if it can't complete (for example, due to lack of information). This is the InstantiationException.
We can see the results of myserver sending such an information-laden <presence/> element to dj in Figure 7-4. As the server connects to the Internet, the Java script is started via the ip-up script and relays the assigned IP address which is shown in Jarl's status bar as the availability information reaches dj's client.
All that remains for the script to do now is to hang around. While the XML stream to the Jabber server remains, and the connection is not broken, our availabiliy will remain as it was as described by the simple <presence/> element we sent. So we simply go into a sort of hibernation. We have no hope of escaping, but it should be taken care of by our ip-down script as described earlier.
    while (true) {
      try {
        Thread.sleep(9999);
      }
      catch (InterruptedException e)
      {
        System.out.println("timeout!");
      }
    }
In fact, when the ip-down script kills our script, the socket connection will be closed, but there was no clean disconnect—no <presence type='unavailable/> was sent by the script to the Jabber server. In this case, the Jabber server will notice that the socket was closed, and generate an unavailable presence element on behalf of the client.
The script in its entirety
Here's the script in its entirety.
import org.jabber.jabberbeans.*;
import org.jabber.jabberbeans.Extension.*;
import java.net.InetAddress;

public class HostAlive
{
  public static final String SERVER   = "gnu.pipetree.com";
  public static final String USER     = "myserver";
  public static final String PASSWORD = "secret";
  public static final String RESOURCE = "alive";

  public static void main(String argv[])
  {

    ConnectionBean cb=new ConnectionBean();

    InetAddress addr;

    try
    {
      cb.connect(addr=InetAddress.getByName(SERVER));
    }
    catch (java.net.UnknownHostException e)
    {
      //from getByName()
      System.out.println("Cannot resolve " + SERVER + ":" + e.toString());
      return;
    }
    catch (java.io.IOException e)
    {
      //from connect()
       System.out.println("Cannot connect to " + SERVER);
       return;
    }

    InfoQueryBuilder iqb=new InfoQueryBuilder();
    InfoQuery iq;
    IQAuthBuilder iqAuthb=new IQAuthBuilder();

    iqb.setType("set");


    iqAuthb.setUsername(USER);
    iqAuthb.setPassword(PASSWORD);
    iqAuthb.setResource(RESOURCE);

    try
    {
      iqb.addExtension(iqAuthb.build());
    }
    catch (InstantiationException e)
    {
      //building failed ?
      System.out.println("Fatal Error on Auth object build:");
      System.out.println(e.toString());
      System.exit(0);
    }


    try
    {
      //build the full InfoQuery packet
      iq=(InfoQuery)iqb.build();
    }
    catch (InstantiationException e)
    {
      //building failed ?
      System.out.println("Fatal Error on IQ object build:");
      System.out.println(e.toString());
      return;
    }

    cb.send(iq);

    PresenceBuilder pb=new PresenceBuilder();
    pb.setStatus(argv[0]);

    try
    {
      cb.send(pb.build());
    }
    catch (InstantiationException e)
    {
      System.out.println("Fatal Error on Presence object build:");
      System.out.println(e.toString());
      return;
    }

    while (true) {
      try {
        Thread.sleep(9999);
      }
      catch (InterruptedException e)
      {
        System.out.println("timeout!");
      }
    }